
The correct pedal order! – How does moving your pedals change your tone?
Introduction
One of the biggest questions you will see asked about pedals is, ‘Is a Klon worth the money?’ and then, ‘What is the correct pedal order?’ Well, today we are going to help you answer the second one! Now, to start with, let us get the obvious out of the way: Your pedal order doesn’t matter! If you like the sound, then that is all that matters! However, in this article, we aim to give you some suggestions on where to start and maybe why you might go for certain orders over others.
So below, we have a video where we feature 5 basic pedal types (A Boost, Overdrive, Modulation, Delay, and a Reverb pedal) and we put them in various orders so that you know what order sounds like what! Hopefully, this gives you an idea of what order you like! This isn’t a ‘you should do this or that’; it is more of a ‘this is what this sounds like.’ Very useful when building a board. So let us begin with our first one!
Todays Pedals
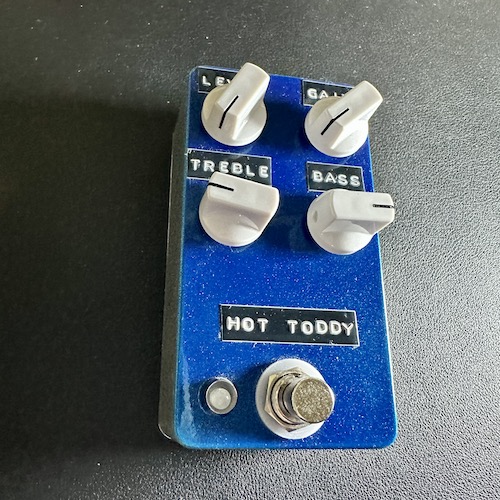
So before we delve into the options of pedal order, let’s first talk about the pedals we will be using. For our boost pedal, we will be featuring the Thorpy FX ‘Heavy Water’ (review Here). This is a high-headroom boost with an added ‘Low’ knob to enhance the low end. Although this pedal has two sides (the second side offering a bit more gain), for this demonstration, we will only be using the standard boost. For our overdrive, we will showcase the JSA Effects ‘Hot Toddy’ (Review Here).
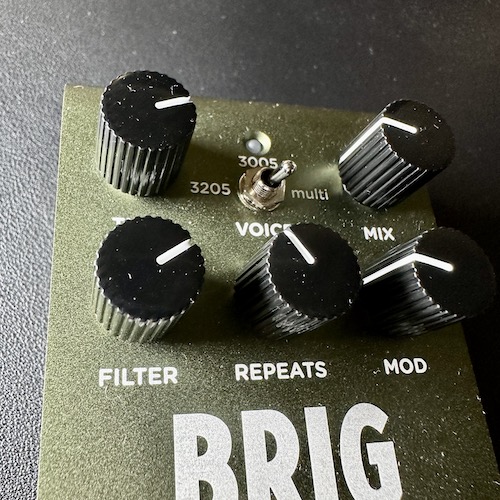
This is a wonderful light overdrive that is perfect for these examples. Then, we move onto our ‘wet’ effects. For modulation, what else could we use but the Boss CE-2w (Review Here)? An iconic chorus that has been heard on millions of songs! Finally, for delay, we will be utilizing the Strymon Brig Delay (Review Here). A lovely Bucket Brigade delay with a plethora of sounds and functions! As for the reverb, we are featuring the affordable Joyo ‘Atmosphere’. Thanks to Affordable Pedals! More on them later.
Boost First
If you have an overdrive pedal on your board and you place your boost before it, then effectively, you’re boosting the signal entering the overdrive pedal! Consequently, the overdrive pedal will clip and saturate more. While you’ll still experience a slight volume increase, it will mainly result from audio compression. If you’re aiming for both overdrive and heavy overdrive sounds, this method accomplishes that, allowing for two overdrive sounds from a clipping pedal with a boost into it.
Boost Second
If you require a volume increase without saturation, then positioning your boost after your overdrive pedal is the best choice. This setup allows the pedal to overdrive the sound before utilizing the boost to amplify the volume (depending on the clean headroom of your amp). This method is preferred for solo or lead boosts. It will still clip your sounds to some extent (depending on how you configure the boost settings), but primarily it will involve a volume boost.
Modulation Before Gain
This isn’t a common practice, but it yields a fantastic sound! Using a modulation pedal, especially a chorus pedal, before gain stages can mitigate its strength or “overpowering” effect. Placing the modulation pedal first means modulating the “clean” guitar signal before overdriving or distorting the modulated signal, resulting in a less pronounced modulated effect.
Modulation After Gain
This is the default setup for most people with modulation pedals. Placing the modulation pedal after the gain stages enables modulation of the entire sound, thus modulating the overdriven/distorted sound. This setup produces a very pronounced and upfront effect since modulation is the final element altering the sound, affecting everything but the modulation.
Modulation Before Delay
Positioning your modulation before your delay means that your sounds will be modulated and then repeated, with the delay repeating the modulated signal. This setup is typical as it repeats the overall effect desired.
Modulation After Delay
If you wish to affect the actual repeats and adjust their sounds, you can place your modulation after the delay. This arrangement somewhat mimics the sound of a tape delay but also affects your “dry” signal, making the modulation very pronounced and obvious.
Reverb Then Delay
Placing your delay after your reverb results in reverberated echoes, which can be an interesting sound, particularly for slow solos. However, caution is advised as it can quickly become muddy and congested, especially with a large reverb and long delay settings.
Delay Then Gain
This setup can produce an awesome sound as the more repeated delays build up, the more overdriven your sound becomes, similar to a tape echo where the preamp can overload and saturate, allowing for dynamic and fun dynamics. However, caution must be exercised to avoid pushing it too far, causing everything to overdrive and become mushy.
Reverb Then Gain
This setup can occur unintentionally for many people. If all your effects are routed into the front end of your amp, they might naturally drive your amp into overdrive, causing your reverb to overdrive naturally. It’s a lovely sound but one that requires caution, as with delay and gain, it can lead to washout and excessive overdrive.
Delay Then Reverb
Now, if I’m honest, this is how I arrange these effects. I always liken it to playing guitar in a cave, where the delay precedes the reverb, reverberating the delayed signal. I believe this is how most people set up their delay and reverb, but how does it sound?
Conclusion
Hopefully, this article has helped you decide your pedal order, maybe made you think to try different pedal orders out! As we stated at the beginning, there’s no one right way! People may insist on a particular pedal order, but remember, there’s no definitive order! Do what sounds best for you! Experiment! Play around and see what sounds you prefer! It’s also worth noting that we didn’t demonstrate any pedals in an effects loop. Perhaps we’ll explore this in a follow-up article, discussing effects in the effects loop, when to use them, and why some pedals may sound better than others in that setup.
A huge thanks to Affordable Pedals for providing the Joyo Reverb pedal. They offer a vast selection of affordable pedals for sale. So, whether you’re seeking your first pedal or an affordable option in general, check out their shop below!
If you want to purchase any of the pedals used, you can use the links below to find some of them! Some are affiliate links so when you buy something we get a small kick back with no extra charge to you. Great way to help the site! Feel free to follow us on Instagram as well!
Pedal Links:
Check out our other Articles here